A design does not have to be flattened to a PNG to reach Resolve. This page shows what each part of a Figma file becomes on the Fusion page, one property at a time, using the real output of a transfer rather than an illustration of one.
Every image below is the result exactly as it landed in Fusion, transferred with Prism from the Figma file shown further down. The section on what does not transfer is on this page for the same reason.
Watch a design move from Figma into Fusion
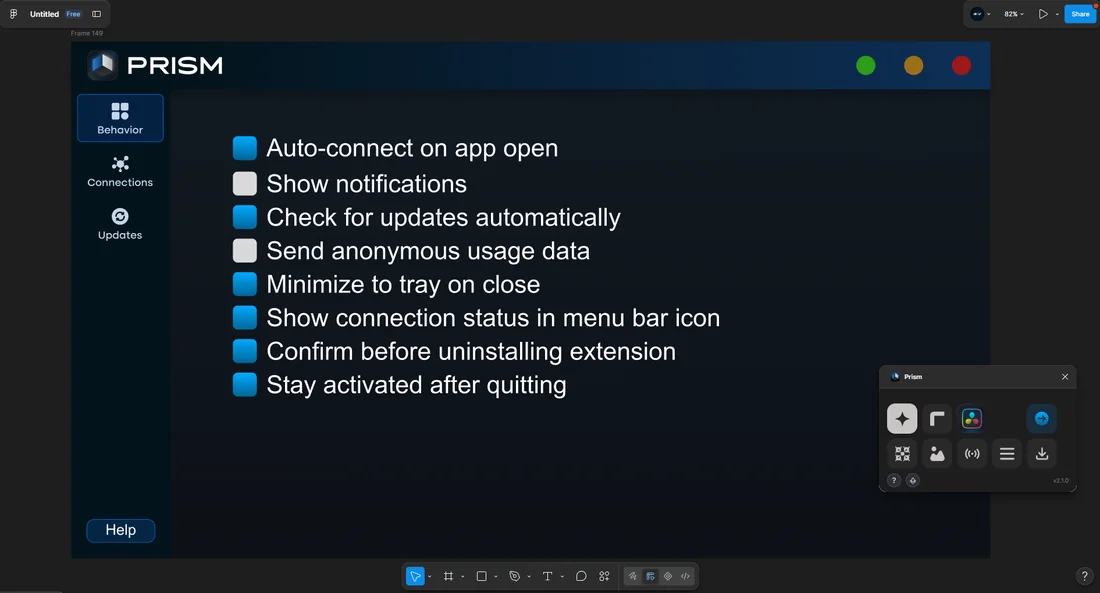
The source design
One Figma frame carrying every case at once: rounded shapes, a polygon, linear and radial gradients, gradient and solid strokes, headline and body text, semi-transparent fills, a blur, a drop shadow and a placed image.
It was sent to Resolve in a single transfer, and everything shown on this page came out of that one send.
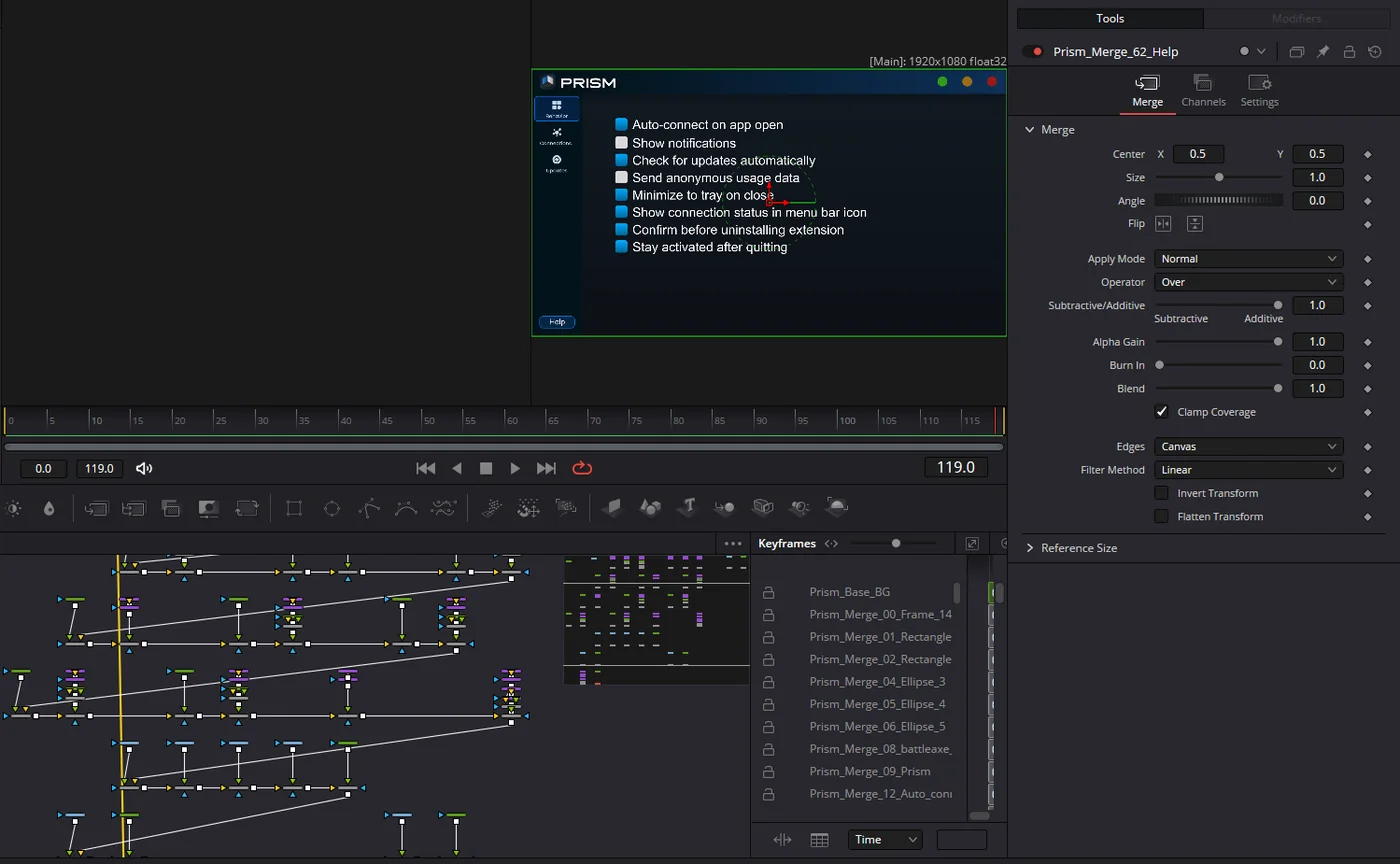
What arrives is a node graph
This is the Fusion page immediately after the transfer, untouched. Every layer of the design is its own branch: a shape node, its render, its gradient, its effects, and a merge that composites it onto the ones below. Nothing here was placed by hand, and nothing is a flattened picture. That is the difference between receiving a design and receiving a screenshot of one.
The Fusion page after one transfer, laid out automaticallyResult in DaVinci Resolve
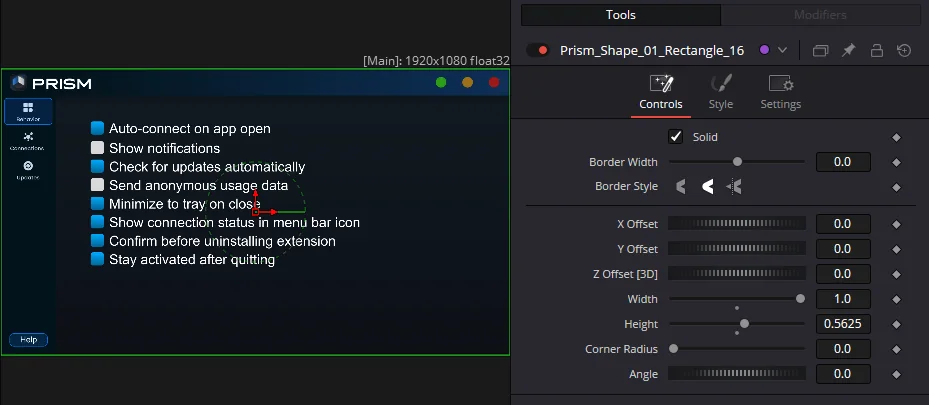
The frames, cards, buttons and dividers a layout is built from, with their sizes, corner radii and polygon side counts.
Each one becomes a real Fusion shape node, not a picture of one. Width, height and corner radius arrive as numbers you can keep turning, so a rounded card can be widened or a polygon given two more sides after it lands, at any output resolution, with no loss and no going back to Figma.
Result in DaVinci Resolve
Linear and radial gradientsGradient Background node
Linear and radial gradients
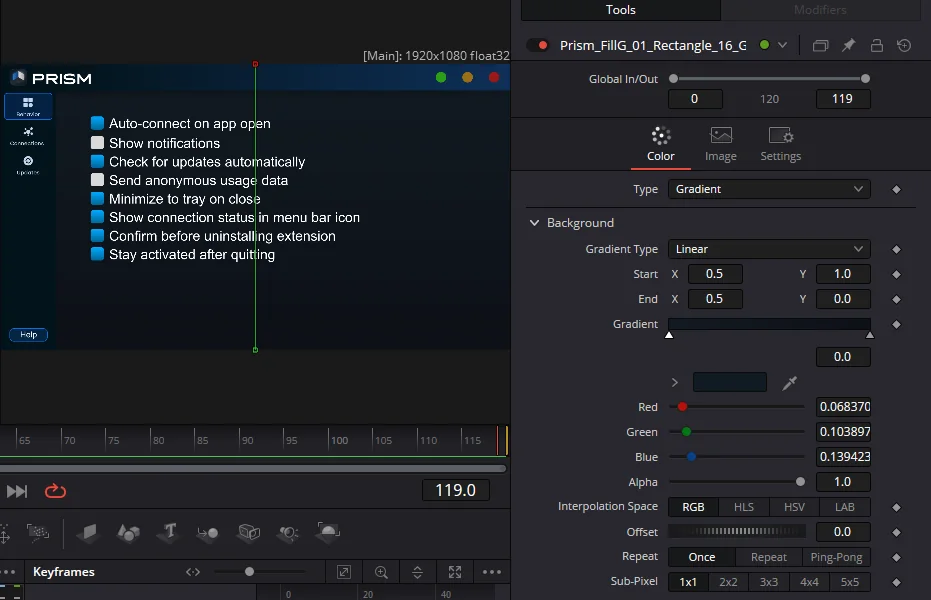
A fill built from colour stops rather than one flat colour, at whatever angle the design puts it.
Every stop arrives with its own colour, its own position along the axis and its own transparency, and the gradient keeps the direction it had in the design. It is a live gradient node in the Inspector: drag a stop, change a colour, spin the angle. This is the part that is most often flattened into a bitmap by other routes, and it is exactly the part that makes a design look designed.
Result in DaVinci Resolve
Text layersText+ you can retype
Text layers
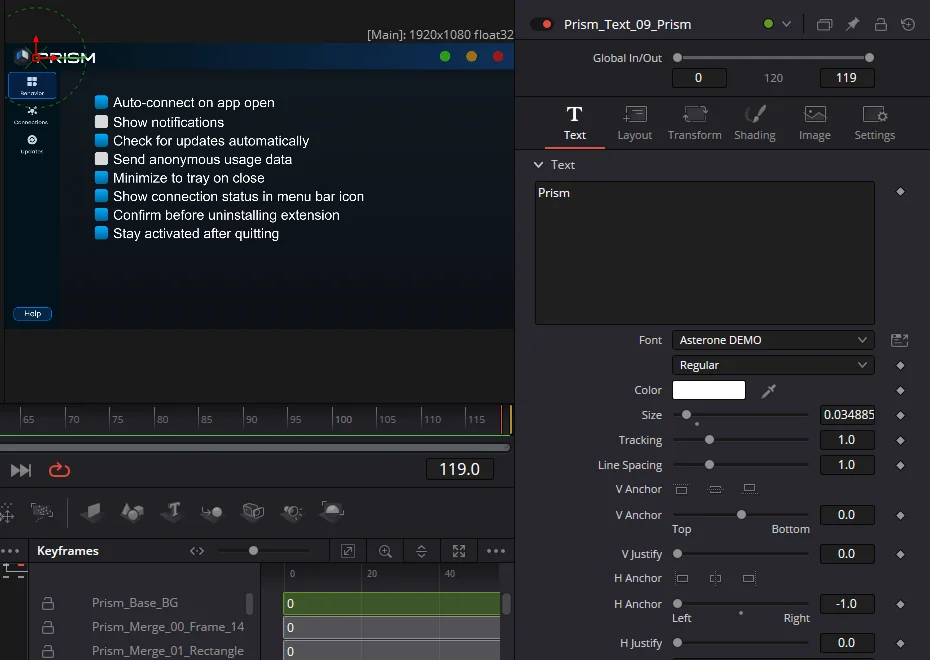
Headlines, labels and paragraphs, with their font, weight, size, letter spacing, line height and alignment.
Text arrives as a Fusion Text+ node with the words still in the Styled Text field, so a caption can be rewritten in Resolve without touching the design file. Left, centre and right alignment are honoured, and so is the vertical alignment inside the text box, which is what keeps a label sitting where the designer put it rather than drifting to the middle. Gradient text fills and text outlines come across too.
Result in DaVinci Resolve
Strokes and outlinesIts own shape, over the fill
Strokes and outlines
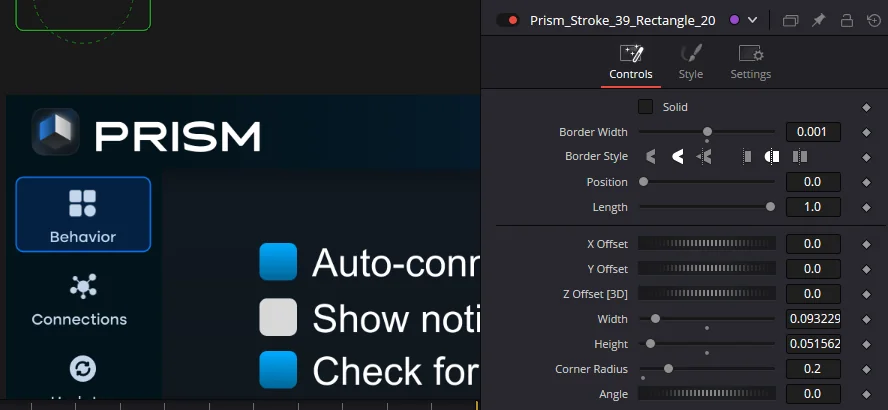
The border around a shape: its thickness, its colour or gradient, and whether it sits inside, outside or centred on the edge.
The stroke is built as a separate shape stacked over the fill, the way Figma composes it, instead of being painted into the same layer. That keeps the two independent: recolour the border without touching what it surrounds, or animate its thickness on its own. Gradient strokes stay gradients.
Result in DaVinci Resolve
Layer blur and drop shadowBlur and Shadow nodes
Layer blur and drop shadow
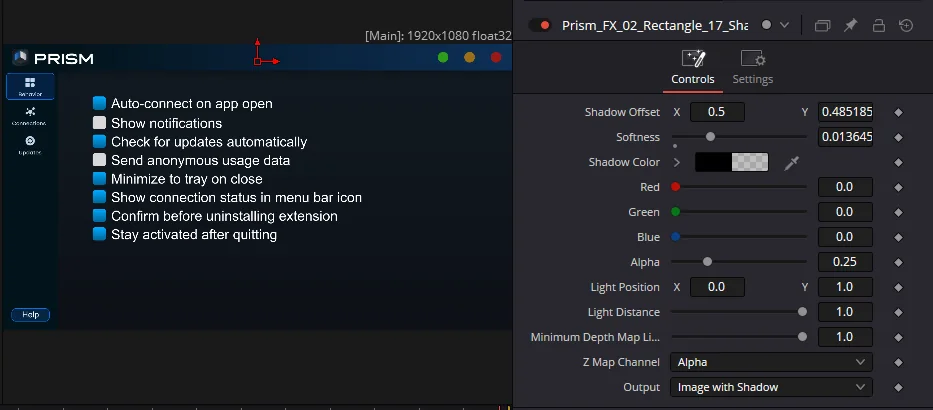
The two effects that carry most of the depth in a modern layout: a softened layer, and a shadow offset behind an element.
Each becomes a genuine Fusion node in the chain, wired between the layer and its merge. The blur radius and the shadow offset, angle, colour and softness come from the design rather than being guessed, and because they are nodes you can keyframe them, disable one to compare, or drop something else in between.
Result in DaVinci Resolve
Opacity, per fill and per layerKept as two separate controls
Opacity, per fill and per layer
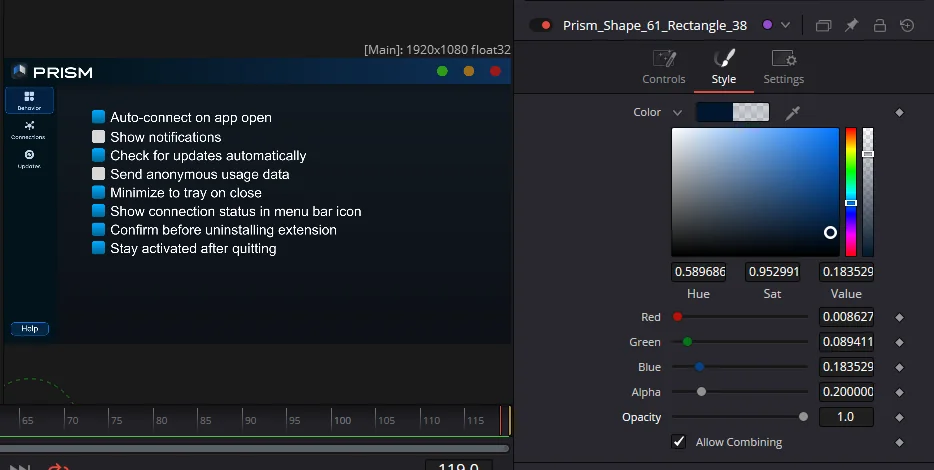
Figma has two different transparencies and designers use both: the opacity of a single fill or stroke, and the opacity of the whole layer.
They stay separate on the way over. A fill at 40 percent arrives at 40 percent inside its own shape node, while the layer opacity lands on the merge that composites it, so lowering one does not silently change the other. Collapsing the two into a single number is the usual shortcut, and it is what makes a transferred design look almost right and impossible to correct.
Result in DaVinci Resolve
Images and complex vectorsLoader nodes
Images and complex vectors
Photos, image fills, icons, logos and any path too intricate to rebuild as a Fusion shape.
These are exported from Figma at full resolution and come in as Loader nodes pointing at real files, placed and scaled where they belong. A logo stays a logo: sharp, correctly positioned, and swappable later by pointing the Loader at a different file.
What does not transfer yet
Four things, named plainly. A list of nothing but yes is not worth reading, and any of these would be found in the first ten minutes anyway.
Masks and clipped frames
A layer masked by another, or a frame set to clip what overflows it, arrives uncut. The Photoshop and After Effects routes rebuild masks; the Resolve route does not yet, so anything relying on a mask needs one node added by hand.
Inner shadow and background blur
Layer blur and drop shadow transfer. Figma's other two effects are skipped rather than approximated, and the transfer log names each one it skipped so nothing goes missing quietly.
Auto layout arrives as positions
Fusion has no equivalent of Figma's auto layout, so a stack arrives measured and placed exactly as it looked, but not as a rule that reflows. Changing one item's size will not push the others along.
Fusion is the destination, not the edit page
The design lands on the Fusion page, as a composition you can drop on any timeline. It does not arrive as Edit page titles or as a Fairlight element, and it is not meant to.
Common questions
Can you import a Figma design into DaVinci Resolve?
Yes. Prism sends the design from Figma straight into Resolve's Fusion page, where it is rebuilt as a node graph: shapes stay shapes, gradients stay gradients and text stays editable, instead of arriving as one flat image.
Does it need DaVinci Resolve Studio, or does the free version work?
The free version of DaVinci Resolve works. Prism runs inside Resolve as a Fusion script rather than as an external tool, which is what keeps it available on the free edition.
Does the text stay editable in Resolve?
Yes. Each text layer becomes a Fusion Text+ node with the words still in its Styled Text field, keeping the font, size, spacing and alignment. You can rewrite a caption inside Resolve without opening Figma.
Do gradients survive the transfer?
Yes. Linear and radial gradients are rebuilt as live gradient nodes, with every colour stop keeping its own position and transparency and the gradient keeping its original direction. They are not flattened into a bitmap.
What does not transfer to Resolve?
Masks and clipping frames, inner shadow and background blur. Auto layout arrives as fixed positions rather than as a rule that reflows. Everything skipped is named in the transfer log rather than dropped silently.
Send your next design instead of rebuilding it
Prism moves Figma, Illustrator and Photoshop designs into DaVinci Resolve or After Effects as editable layers. The free edition of Resolve is enough.